

Hey there! As a supplier of Flange Nut Din 6923, I'm super stoked to share with you the ins and outs of installing these nuts correctly. Whether you're a DIY enthusiast or a professional in the industry, getting the installation right is crucial for the performance and safety of your project. So, let's dive in!
What is a Flange Nut Din 6923?
Before we get into the installation process, let's quickly go over what a Flange Nut Din 6923 is. These nuts are a type of fastener with a wide flange at one end. The flange acts as a washer, distributing the load over a larger area and providing better resistance to loosening. They're commonly used in applications where a secure and stable connection is required, such as automotive, machinery, and construction.
Tools You'll Need
To install a Flange Nut Din 6923 correctly, you'll need a few basic tools:
- Wrench or Socket Set: Make sure you have the right size wrench or socket to fit the nut. Using the wrong size can damage the nut or the bolt, and it won't provide a proper fit.
- Torque Wrench: This is optional but highly recommended, especially for applications where precise torque is required. A torque wrench allows you to tighten the nut to the specified torque value, ensuring a secure and consistent connection.
- Threadlocker (Optional): If you're working in an environment where vibration or movement is a concern, you may want to use a threadlocker to prevent the nut from loosening over time. There are different types of threadlockers available, so choose one that's appropriate for your application.
Step-by-Step Installation Guide
Now that you have your tools ready, let's walk through the installation process step by step:
Step 1: Prepare the Surface
Before installing the nut, make sure the surface where the nut will be placed is clean, dry, and free of any debris or contaminants. This will help ensure a good connection and prevent any damage to the nut or the bolt. You can use a wire brush or a clean cloth to clean the surface if necessary.
Step 2: Inspect the Nut and Bolt
Take a close look at the nut and the bolt to make sure they're in good condition. Check for any signs of damage, such as cracks, burrs, or stripped threads. If you notice any damage, don't use the nut or the bolt, as it may not provide a secure connection.
Step 3: Thread the Nut onto the Bolt
Carefully thread the Flange Nut Din 6923 onto the bolt by hand. Make sure the nut is aligned properly with the bolt threads and that it's turning smoothly. If you encounter any resistance, stop and check to make sure the threads are clean and undamaged.
Step 4: Tighten the Nut
Once the nut is threaded onto the bolt, use a wrench or socket set to tighten it. Start by applying gentle pressure and gradually increase the force as you turn the wrench. Make sure you're turning the wrench in the correct direction (usually clockwise to tighten).
If you're using a torque wrench, set it to the specified torque value for the nut and bolt combination. This will ensure that the nut is tightened to the correct level of force, which is important for the performance and safety of your project.
Step 5: Check the Tightness
After tightening the nut, check to make sure it's secure. You can do this by trying to turn the nut slightly with your fingers. If it moves easily, it may not be tight enough, and you'll need to tighten it further. If it's too tight and you're having trouble turning the wrench, you may have overtightened the nut, which can also cause problems.
Step 6: Apply Threadlocker (Optional)
If you're using a threadlocker, apply it to the bolt threads before threading the nut onto the bolt. Follow the manufacturer's instructions for applying the threadlocker, and make sure you allow enough time for it to dry before tightening the nut.
Common Mistakes to Avoid
Here are some common mistakes to avoid when installing a Flange Nut Din 6923:
- Using the Wrong Size Wrench or Socket: As mentioned earlier, using the wrong size wrench or socket can damage the nut or the bolt and prevent a proper fit. Make sure you have the right size tool for the job.
- Overtightening the Nut: Overtightening the nut can cause the threads to strip, damage the bolt or the nut, and even break the bolt. Always use a torque wrench if possible, and follow the recommended torque values.
- Not Cleaning the Surface: If the surface where the nut will be placed is dirty or contaminated, it can affect the connection and cause the nut to loosen over time. Make sure you clean the surface before installing the nut.
- Using a Damaged Nut or Bolt: Using a damaged nut or bolt can compromise the integrity of the connection and lead to safety issues. Always inspect the nut and bolt before installation, and replace any damaged parts.
Other Types of Nuts
In addition to the Flange Nut Din 6923, there are other types of nuts that you may find useful in your projects. Here are a few examples:
- Wing Nut Din 315: These nuts have two wings that allow you to tighten and loosen them by hand, making them easy to use in applications where frequent adjustments are required.
- Cap Nut Din 1587: These nuts have a closed end that provides a finished appearance and protects the bolt threads from damage. They're commonly used in applications where aesthetics are important.
Conclusion
Installing a Flange Nut Din 6923 correctly is essential for the performance and safety of your project. By following the steps outlined in this guide and avoiding common mistakes, you can ensure a secure and reliable connection. If you have any questions or need further assistance, don't hesitate to reach out. We're here to help you find the right fasteners for your needs and ensure your projects are a success.

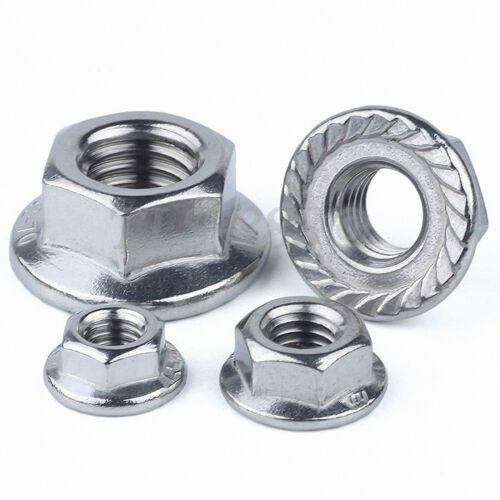
Whether you're working on a small DIY project or a large industrial application, we have a wide range of Flange Nut Din 6923 and other fasteners to meet your requirements. If you're interested in purchasing our products, feel free to contact us for more information and to discuss your specific needs. We look forward to working with you!
References
- Machinery's Handbook, 31st Edition
- Fastener Training Manual, Industrial Fasteners Institute